What Does Iphone X Reviews of Mavic Air Look Like
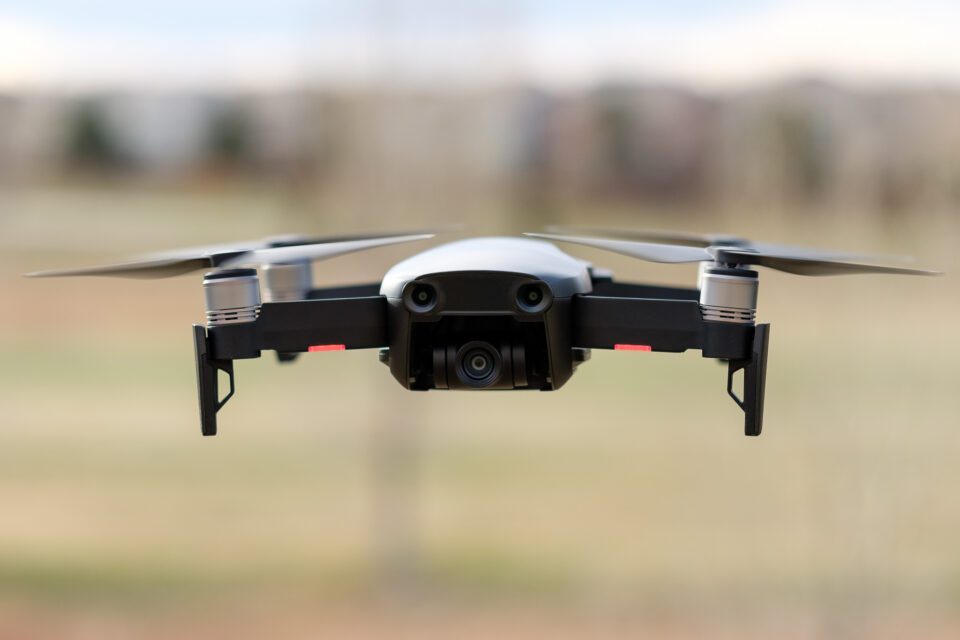
This is a detailed review of the DJI Mavic Air drone used for aerial photography and videography. As I was deciding on what gear to bring for a trip to New Zealand earlier this yr, my biggest dilemma was whether to take a drone with me or not. The thing is, while I dear the idea of being able to accept images and videos from unique vantage points, my biggest struggle with drones so far take been their large sizes and heavy weights. I had high hopes for the DJI Phantom three Pro when I bought it a couple of years ago and while it is a great drone, I rarely ever bring information technology with me when traveling internationally, as it is yet another large handbag to carry around. When DJI appear the Mavic Pro, I really loved the thought of a foldable drone that could fit in a camera bag. Simply then the Mavic Air came out, promising to be lighter and even more portable – pretty much an ideal solution for lightweight travel. Without much idea, I got a hold of the Mavic Air, packed it in my bag and took off to New Zealand.
Without a uncertainty, DJI has established itself as a very recognizable and popular brand in the drone industry. The company has all-encompassing experience in making different types of drones for all kinds of needs – from basic consumer-grade and professional drones that sport larger and more capable cameras, all the way to enterprise-grade drones that can elevator large camera rigs. The DJI Mavic Air is the newest drone in the "consumer" line of products. At an MSRP of $799 for the drone itself, it is twice more expensive than the virtually basic "Spark", but $300 cheaper than its larger brother, the Mavic Pro. Thank you to its foldable pattern, it is the smallest of the iii. Let'southward take a look at the near of import specifications of the DJI Mavic Air drone.
Specifications
- Connection Type: WiFi
- Maximum Speed: 68.4 kph (S – manner), 28.8 kph (P – mode), 28.eight kph (Wi-Fi mode)
- Max Flight Fourth dimension (no wind): 21 minutes (at a consistent 25 kph)
- Sensing Arrangement: Forward, Backward, Downward
- Controller Max Transmission Distance: 4000m (FCC, unobstructed with zero interference)
- Gimbal Stabilization: 3-axis (tilt, roll, pan)
- Gimbal Mechanical Range: Tilt: -100° to 22°, Roll: -30° to thirty°, Pan: -12° to 12°
- Gimbal Controllable Range: Tilt: -xc° to 0° (default setting), -90° to +17° (extended)
- Sensor Size: i/2.3" CMOS
- Sensor Resolution: Constructive Pixels: 12 MP
- Sensor ISO Range: 100-3200 (photograph and video)
- Lens: f/two.8 max aperture, 24mm equivalent, 85° FOV
- Still Photography Modes: Single Shot, HDR, Burst Shooting (3/5/vii frames), AEB, Interval
- Photo Format: JPEG / DNG
- Video Format: MP4 / MOV (H.264 / MPEG-four AVC)
- Video Resolution: 4K Ultra HD (3840×2160 @ 24/25/30p), 2.7K (2720×1530 @ 24/25/30/48/50/60p), FHD (1920×1080 @ 24/25/30/48/fifty/60/120p), HD (1280×720 @ 24/25/30/48/fifty/lx/120p)
- Max Video Bitrate: 100 Mbps
- Internal Storage: 8 GB
- Battery Capacity: 2375 mAh
- Battery Weight: 140g
- Supported Memory Cards: Up to 128 GB, microSD Class ten or UHS-ane Rating Required
- Dimensions (Folded): 168×83×49 mm (50×W×H)
- Dimensions (Unfolded): 168×184×64 mm (50×W×H)
- Takeoff Weight: 430g
- Price: $799
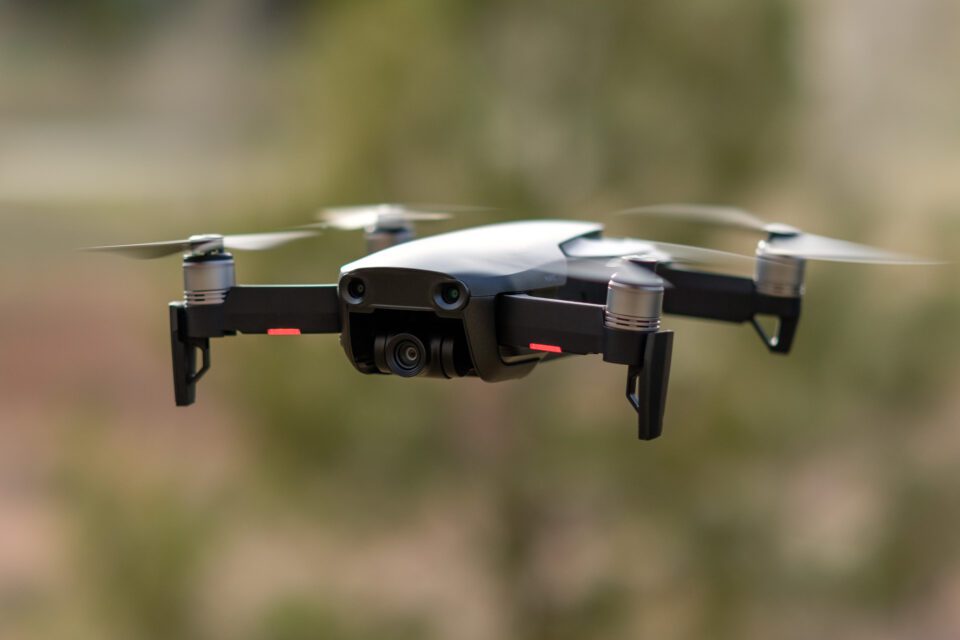
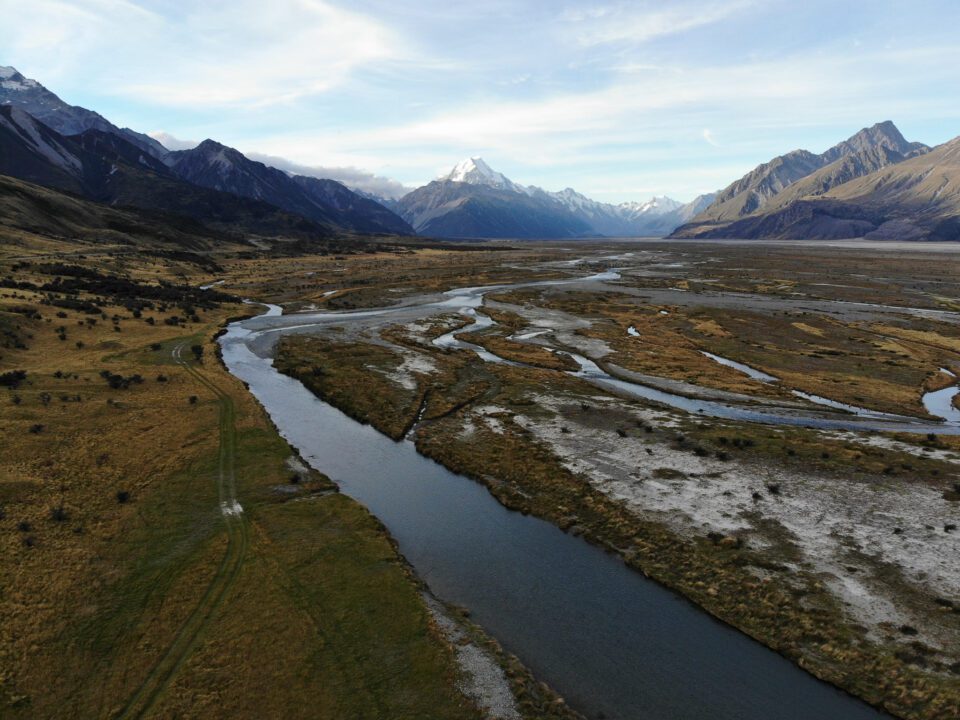
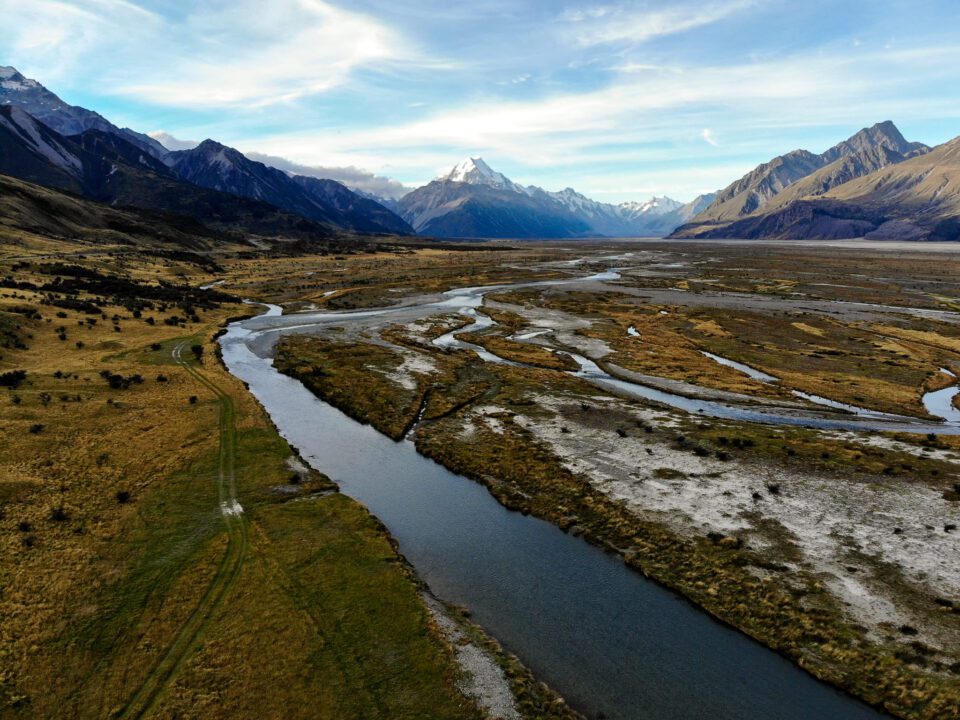
The crazy thing is, the Mavic Air is just 430 grams when it is ready to fly. That's 3x every bit low-cal as my Phantom 3 Pro. Only that'south not all, just take a wait at how tiny it is compared to the Phantom:

As you tin see, the drone together with the controller are the size of just the Phantom 3 controller past itself! That'southward a massive size difference. The Phantom requires a defended bag to carry it in thank you to its large size. Add together a few batteries, a charger and some extra accessories, and it can become as heavy equally a photographic camera handbag. In comparing, the Mavic Air with its controller easily fit in two of my photographic camera bag's compartments and even if I added iii batteries and the charging equipment, information technology would still exit plenty of room for my camera gear. For me, it is the difference of taking a drone or leaving it at home, especially when going out on long hikes where every gram counts.
In addition, always since the new Mavics and the Phantom 4s came out, in that location is little reason for me to even go on the Phantom, because they are significantly more capable. My Phantom 3 doesn't accept any sensors to discover objects, so if I am not careful, it volition crash into things. And if it does crash, given its size, weight and strength, it can obviously cause more damage. It is louder and much more visible in the air, cartoon more attention. Just most importantly, information technology has the same 1/2.3″ CMOS sensor equally the tiny Mavic Air! Certain, it tin record 4K, but its recording adequacy is limited to threescore Mbps, whereas the Mavic Air can record at 100 Mbps. The only advantages for the Phantom iii I tin can think of, are better range (Radio vs WiFi), ameliorate stability in windy conditions due to larger build and more powerful motors, and better overall battery life when flight. Nevertheless, to me, all these are superseded past the size and weight advantages of the Mavic Air.
Build Quality and Construction
Just like other similar DJI products, the Mavic Air is made extremely well. Both the controller and the drone feel like they have been made to final, with high quality and nonetheless lightweight plastic structure. Later on 2 months of utilise of the drone, and quite a fleck of abuse in New Zealand, nothing vicious apart and the drone is still performing like new. Although I did not crash it anywhere, I took off from some rough areas and landed on grass that was taller than information technology should have been on a couple of occasions and the drone did just fine. I flew it in rain for a while (come across the rainbow scenes in the YouTube video below) and it did not suffer from water damage either, although it is non something I would recommend doing! The drone survived it all…
The drone example, along with the charger and other components are all very well fabricated as well from loftier quality materials. What I liked about the charger, is that there are two standard USB slots, so that yous can charge the controller, as well equally another device like your telephone at the same time. This came in actually handy in New Zealand, where I did not have access to more than than one outlet in my vehicle.
Mavic Air "Fly More" Combo
If y'all are wondering what parts yous will demand for the Mavic Air, instead of piece-mealing everything, I would recommend to go for the "Fly More than" philharmonic that DJI is offering for $200 more. Basically, instead of the basic kit that comes with the Mavic Air, you get 2x more batteries, a battery charging hub, 2x more props and a shoulder bag. Every component is very useful, but the actress batteries and the amazing charging hub that lets you accuse up to 4 batteries are admittedly worth having. Considering that the batteries by themselves are priced at $80 each and the battery hub is some other $50 on top, the bag and the additional rotors are basically free extras.
The Mavic Air is bachelor in three different colors: Onyx Black, Arctic White and Flame Reddish. I similar the black version, merely that'south a personal preference. If I were to get more than one unit of measurement, I would probably pick different colors to make it easier to differentiate between them. The Mavic Air is protected by a nice instance, which is prissy and meaty. It is a proficient thought to leave the plastic gimbal protector on when traveling, especially if you are not going to exist using the protective case, as you could harm the gimbal.
To be honest, I really liked the bag that came with the "Fly More" combo. Information technology is very small-scale and stylish and information technology fits everything easily that comes with the combo:
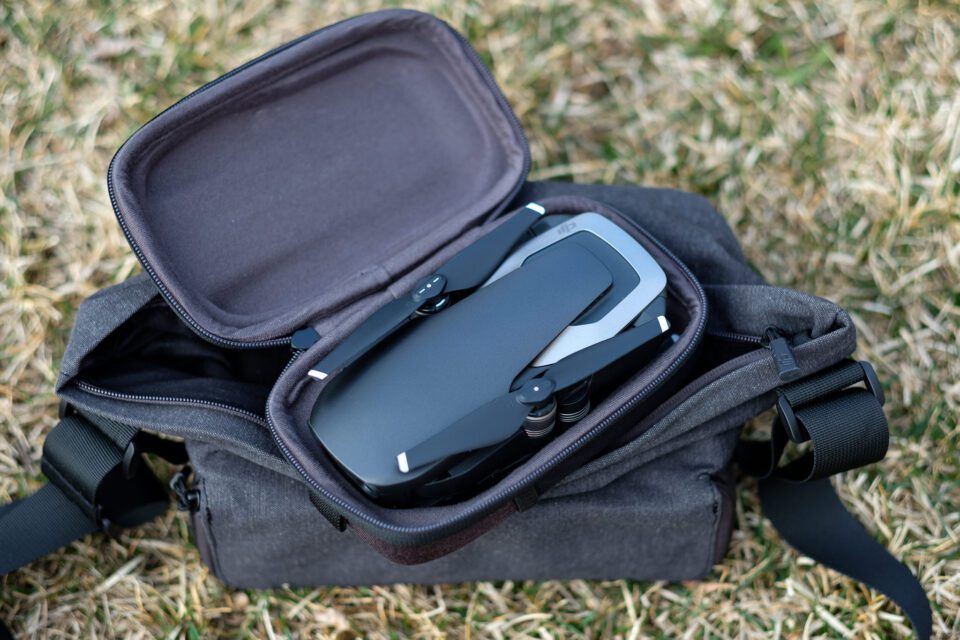
In fact, in that location is some extra room for more than batteries, which is nice. For me personally, I would be traveling with at least 4 batteries, since those batteries don't last very long (more on bombardment life beneath).
The charging hub can take four batteries total, and so if you accept 3-4 batteries, you tin can connect them all simultaneously. The benefit of this, is that you do not have to keep on cycling through batteries, connecting and disconnecting them 1 by one. This is another reason why the Mavic Air for me makes much more sense than the Phantom 3 Pro – I can attach all batteries that need to be charged, and get to bed, expecting all batteries to be fully charged by the morning. It is important to betoken out that the hub does not charge all batteries simultaneously – it charges them one at a fourth dimension.
Mavic Air Controller
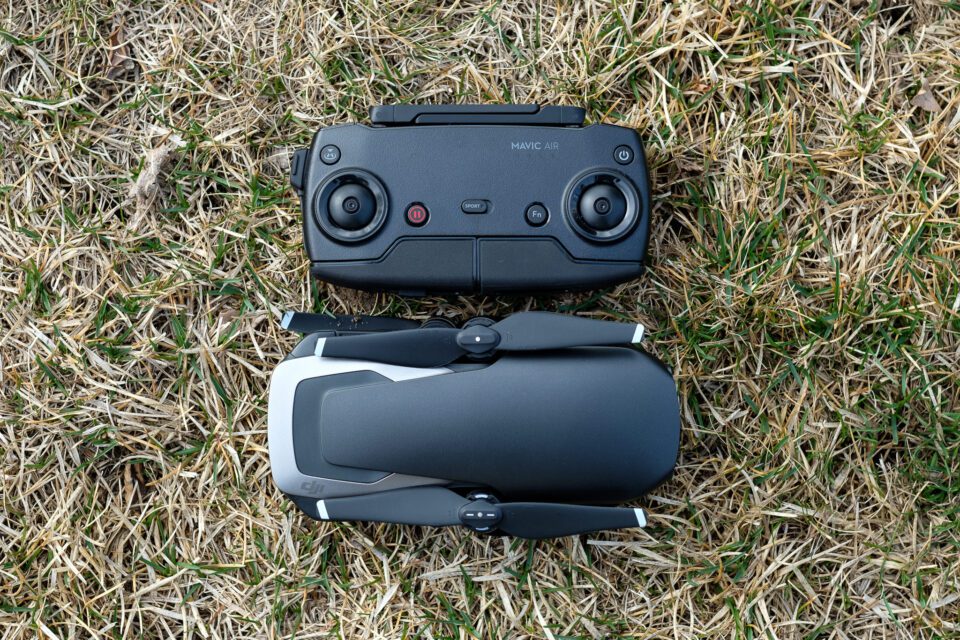
Unlike the massive controller on the Phantom-series, the controller on the Mavic Air is much smaller. In fact, all things considered, it is probably a third of the size of the Phantom controller. DJI designers came upwards with an astonishing manner to get in very compact. The radio antennas are nicely folded and the joystick sticks are actually tucked away into the controller, making information technology hands pocketable. Take a look at the size of the controller when compared to the drone:
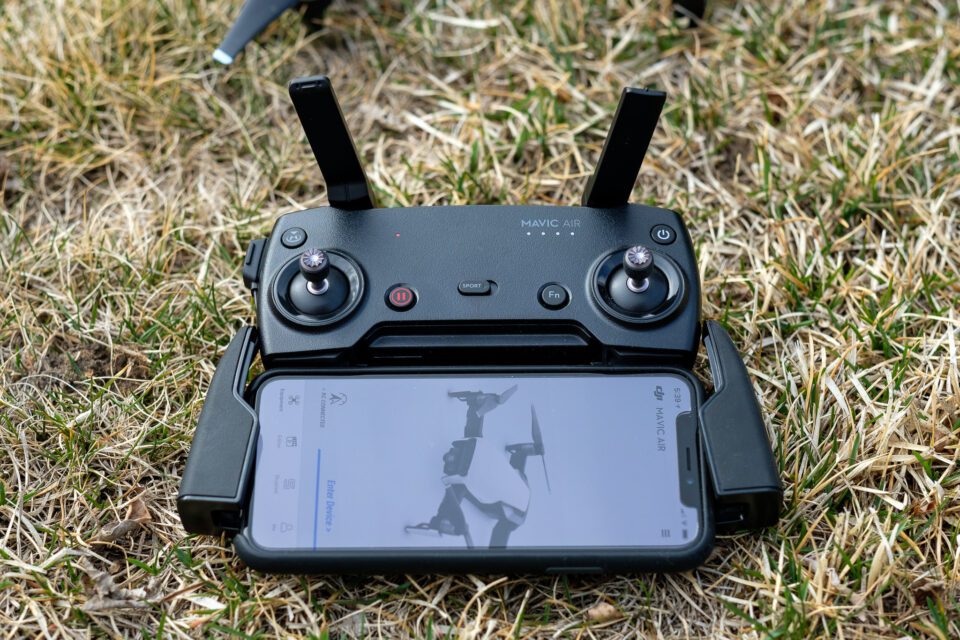
To set it up, all you have to do is open up up the radio antennas, open up the ii compartments on the bottom, pull out the two joysticks and screw them in, so adhere the correct cable to your telephone. All this can be done in less than xxx seconds. Here is how the controller looks when it is set to go:
To plow on the drone, you press the battery push button once, so you printing it again and concord it. The controlled is powered the same way. Once both are on, you expect for the controller to sync up with the Mavic Air, which can take a minute. Subsequently the controller is synced, the red light on the controller will turn green, equally it does with other DJI drones. From in that location, you have to launch the DJI Get 4 app on your device to start controlling the unit.
DJI GO 4 App
To fly the drone, I used my iPhone X, which fit nicely on the unit, as can be seen from the photograph in a higher place. The DJI GO 4 App worked very well and I did not feel whatsoever serious glitches, which is great, because that's not the experience I've had with the regular DJI GO app that controls my Phantom three Pro. I had a bunch of problems with firmware updates (specially early on), IMU calibration errors and basic connectivity bug, which made it rather frustrating to use the Phantom 3 Pro. I'g happy to say that I did not feel any of these problems with the new app.
When firing upwards the app for the beginning time, I was prompted for a "Precise Wing Prophylactic Database Update", which went through a quick update. Subsequently that, the app prompted me to install the latest firmware, which took about xv minutes to install:
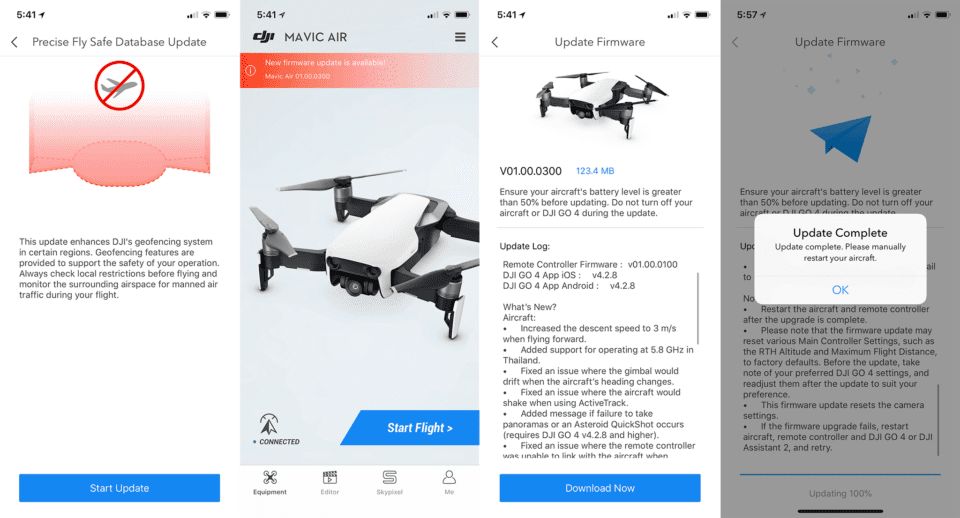
From there, I was able to get into the app to starting time flying. At this point, the unit had not been calibrated, and so that's was the next stride. Calibrating was very easy – all I had to do was rotate the drone horizontally, then vertically:

After that, I was back to the chief screen. The drone was ready to fly, merely to make sure that the GPS navigation was ready to go, I had to wait for another infinitesimal or so. The top left corner turned from orangish to dark-green, indicating that the GPS was also ready:
Taking off is very easy. All you accept to do is touch on the take off icon on the top left corner and the screen volition ask if you want to record the precise location of the take-off signal, so that it can render there after the flight. You make the selection and go on, after which the drone will fire up its propellers and have off.
Flying the Drone
Flying the drone is very piece of cake, even for a beginner. My two boys aged 9 and 10 had never flown a drone before, and subsequently I explained them how the controls work, they were able to wing the drone with very little supervision. And then if you lot are worried almost having nil flying experience, yous will be surprised past how easy it will be to fly it. Go along in mind that a drone is non like a plane – it just hovers in the air when you lot don't do anything, waiting for you to move it. So it is pretty hard to mess upwards.
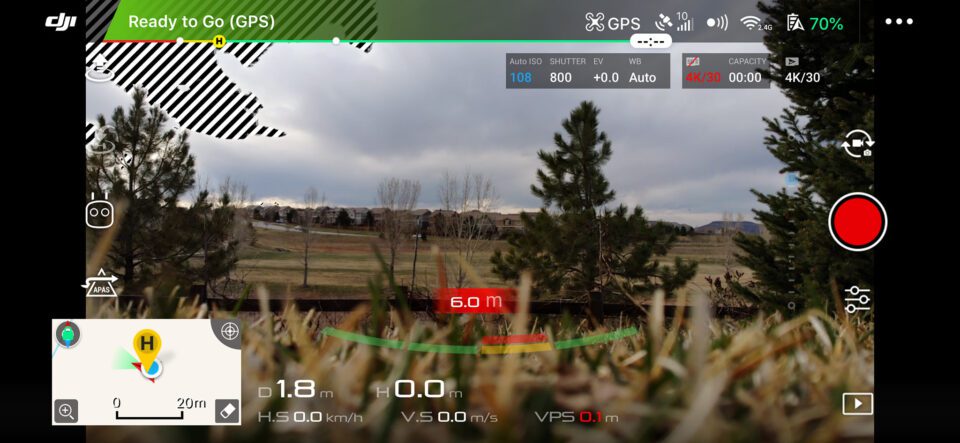
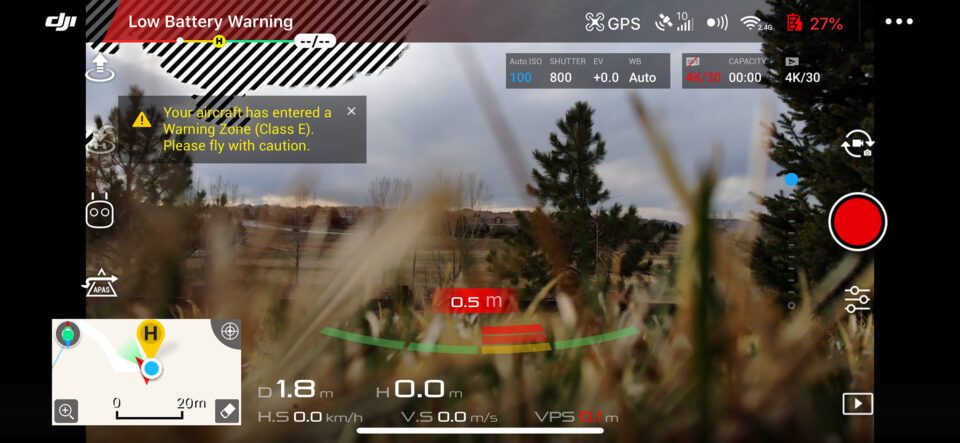
The joysticks are dainty and responsive. The ane on the left allows the drone to fly upwardly and downwards, besides equally rotate horizontally, whereas the one on the right allows you to motility it front end to back and sideways. There are boosted buttons and controls to capture images and video, every bit well as control the gimbal, but I wouldn't worry also much about those in the beginning. Get used to flying beginning, and so worry almost the extra controls. In fact, many of the functions can be performed direct from the app, then that you can continue your optics on the drone and the screen most of the fourth dimension. Hither is what the screen on my iPhone looked similar when I took off:
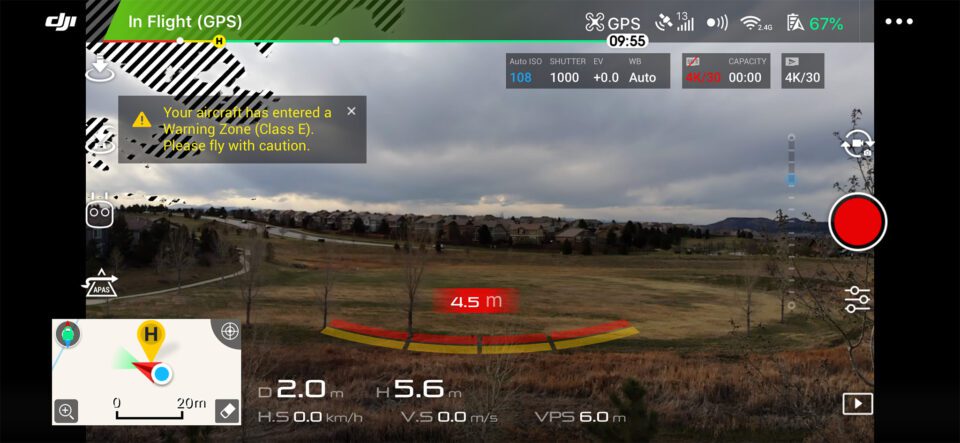
The app is pretty versatile and in that location are many features, some of which I will get through below. Aside from existence able to run across what the drone sees, or is going to record / take pictures of, y'all have plenty of other useful information. Yous can see the distance, the speed and other relevant information, which is very useful to know in the field. If there is current of air that is shaking up the drone, you lot will get wind warnings. And if y'all are flying in a limited zone, yous will get notifications as in the screen above (I was flight the drone about my house). DJI manages zones quite well and if you attempt to fly in prohibited areas (shut to airports, etc), the app might non even permit yous to fly the drone. This is good, because it prevents people from beingness able to launch drones in places where they shouldn't be allowed to fly them. Unfortunately, some select individuals do quite a flake of harm using drones in ways they shouldn't, spoiling it for the rest of us. So please, fly responsibly!
DJI GO four App Settings
The DJI GO 4 App has a lot of options to cull from, which might make it look complex, especially for those who are only starting out. Don't worry, y'all don't need to know all those settings – in fact, the drone will fly with the default settings just fine and you only need to alter settings when y'all are ready. To admission the master settings menu, press the iii dots on the right side of the screen and you will exist presented with a menu like this:
I would recommend to go along most of the settings with the default values, but feel costless to bank check these settings out and experiment afterwards y'all are more than comfortable with flying. In some situations, y'all might demand to disable some of the functions, or perform specific tasks, such as controller calibration and push button customization.
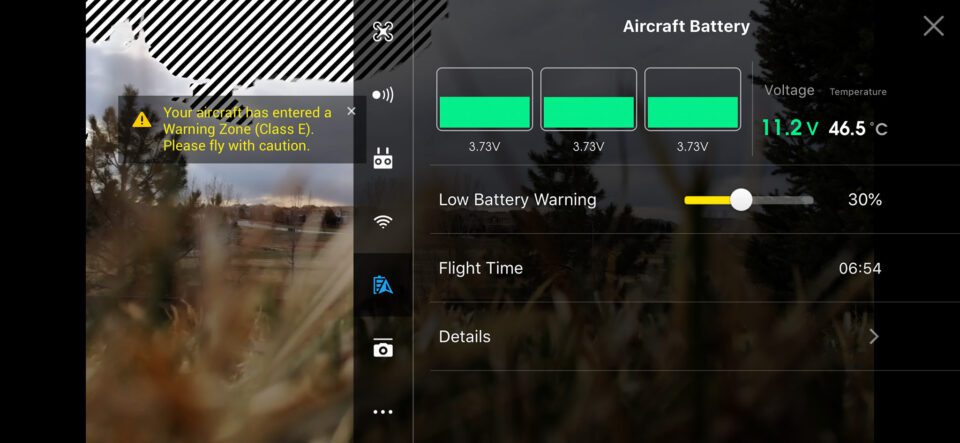
This is also the identify from which you tin can expect at the battery status, prepare depression battery warning and look at other useful information, such as full flying time:
Bombardment Life
Speaking of battery life, those pocket-sized batteries definitely exercise get eaten up pretty chop-chop. Although DJI advertises flight fourth dimension of 21 minutes, I take not been able to achieve those kinds of numbers, partially because I am non very experienced with flying drones, so I cannot perform quick takeoffs and landings, but besides considering I felt a bit nervous letting the drone battery drain besides much – I did not want to lose the drone, as information technology was the only drone I had with me in New Zealand. I think the longest I managed to wing on a single battery was effectually fifteen minutes, which is not too bad considering that I had three fully charged batteries with me before the showtime flight. To be honest, that's non also far from what I typically get on my Phantom 3 Pro, which I can fly for maybe 2-3 minutes longer before the battery has to be swapped out.
Merely if you've never flown a drone, those ten-15 minutes will laissez passer very quickly, which is why it is a proficient idea to have those actress batteries from the "Fly More" combo. With three batteries, y'all can record well-nigh forty-45 minutes of video and you can take plenty of pictures – enough for well-nigh situations.
Once you start getting to the threshold you ready in the app, you will outset getting "Depression Battery Alert" messages in the app, so that you take enough time to become back and land the drone:
Landing the Mavic Air is pretty easy – I would either use the landing icon on the app, or use the joystick. Make sure that the spot you lot are planning to land is on even and clean, or you lot risk damaging the drone rotors. The sensors on the Mavic Air work very well for easy and safety landings, merely you should be careful when trying to grab the drone in mid-air – unlike the Phantom-series, there is little room to grab the drone. If y'all don't do information technology right, the drone will recall of the grabbing strength every bit air and will spin upwardly its rotors to the maximum to residuum it out. And so unless you know what you are doing, I would just recommend to land the drone on the footing to keep information technology condom.
Keep in mind that you have to also charge the battery inside the controller. It will take about three hours to fully charge the controller and once information technology is charged, it will last for about 2.5 hours, which is quite a flake.
Video Settings
By default, the drone will exist set up to tape video, which you tin can record either into the congenital-in eight GB memory, or into a split microSD bill of fare. While it is nice to have some congenital-in retentivity, I would strongly recommend to become a fast microSD card that won't bungle downwardly when you write 4K video into it. I used a 64 GB SanDisk Extreme Pro microSD card, which was pricey, but capable of very fast throughput, even beyond 100 Mbit/sec rates. Once you lot insert a microSD card into the unit of measurement, you tin can format it from the app and go information technology fix to record videos and photos.
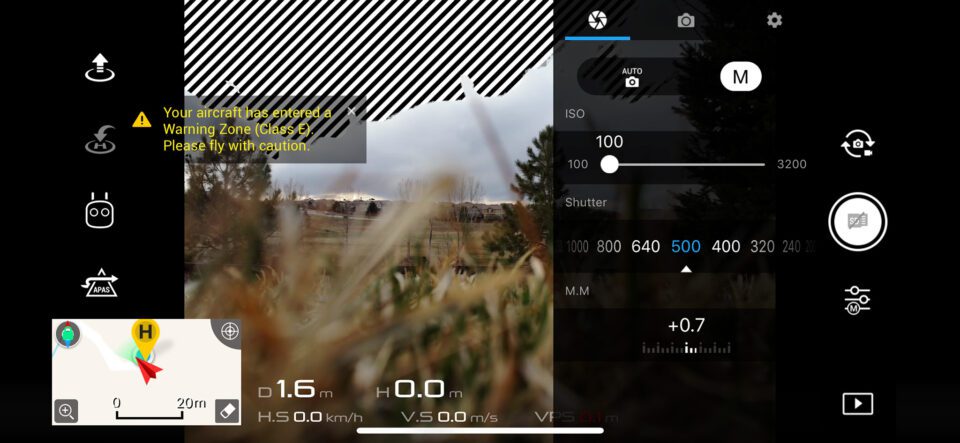
The video settings tin can be accessed by pressing the icon with 3 sliders on it. The "discontinuity" tab will take the basic camera settings for shooting video, such equally photographic camera mode, ISO, shutter speed and exposure compensation:
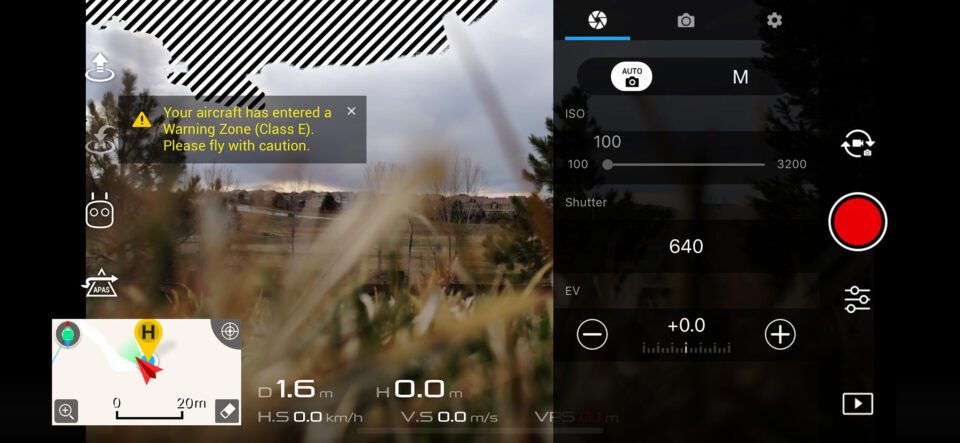
While the drone does a skillful job at properly exposing video, I have seen a number of cases where the drone would slowly change exposure, resulting in inconsistent videos. For this reason, I would recommend to switch to manual before you start recording and adjust your settings
betwixt clips.
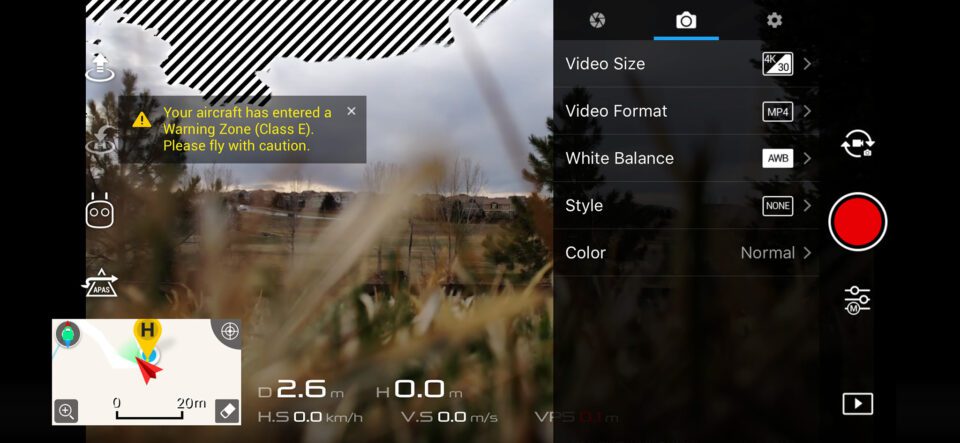
The adjacent tab is the "camera" tab and that's where you volition find the most of import settings for video recording. From here, you can pick video size (from 720p all the way to 4K), video format, white balance, manner and color:
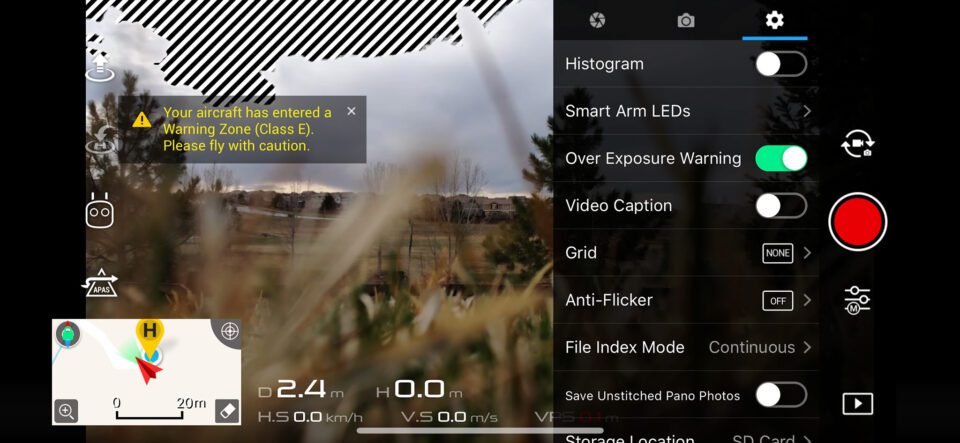
The last "settings" tab will permit you to go through other relevant functions. For instance, you can plow on the histogram, over exposure warning, set up filigree, anti-flicker, etc., as well as choose the storage where videos volition be saved:
Photograph Settings
To switch to photo fashion, you simply press the icon higher up the red video record button, which switches the camera to photograph style. Once you do that, you volition see that the menus will alter accordingly. Again, there are three tabs in the photo style besides. The commencement one is to control the exposure settings:
While the second i is at that place to gear up photo options, such as photo release fashion, image size, image format, etc:
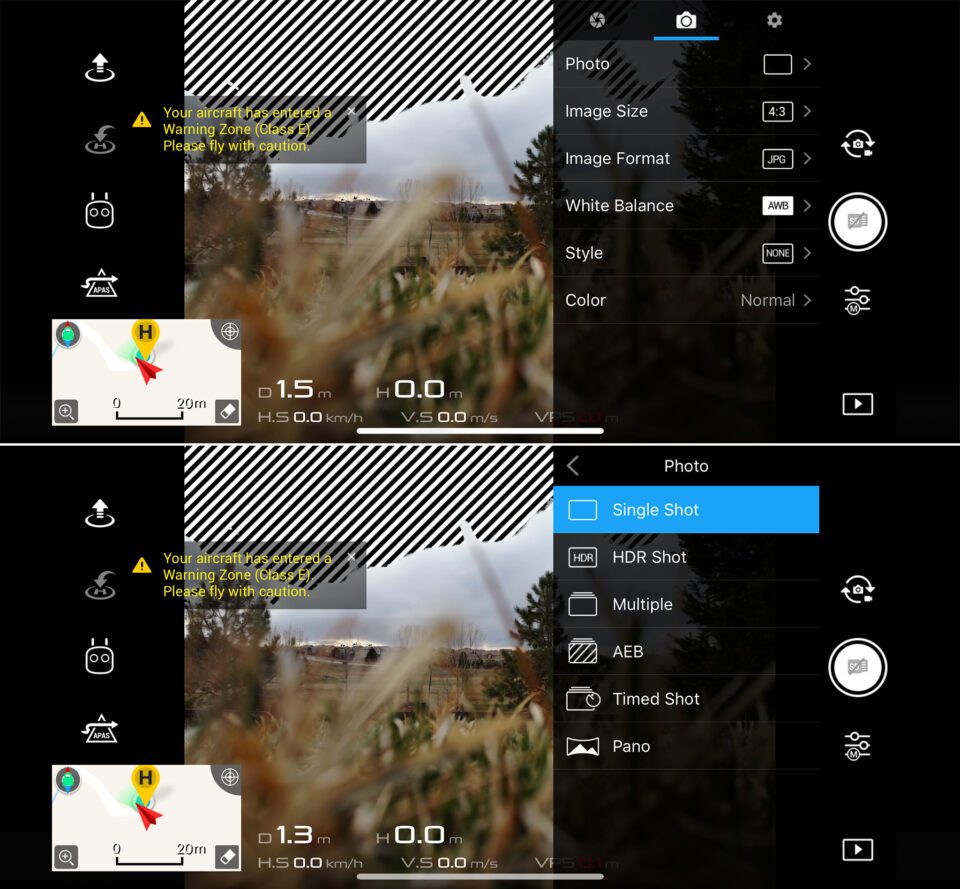
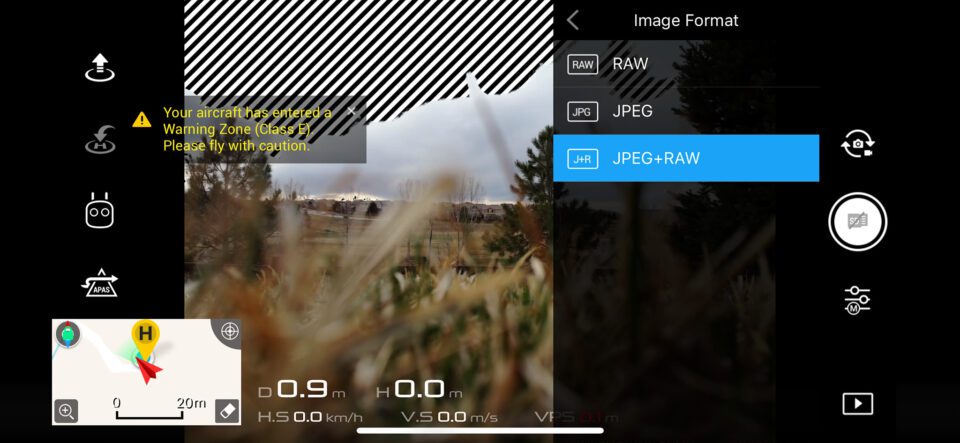
The first menu pick is the ane you will probably be accessing the near – that's where you pick between dissimilar release modes. The menu option you definitely do non want to skip is "Paradigm Format". That'southward where you have a chance to pick betwixt RAW, JPEG, or JPEG + RAW. I would recommend to either go with RAW or JPEG + RAW options, and then that you lot have more than post-processing potential:
Keep in mind that the drone has a 12 MP camera, so you lot are better off taking pictures than trying to extract frames out of 4K footage.
Other Features
The Mavic Air comes with a boatload of other features called "Quickshot" that you tin can effort. Personally, I didn't care for these, but some of them can exist quite cool to endeavour out. Beneath is a list of things you can exercise with the drone:
- Sphere Panorama Manner: Mavic Air will automatically shoot and stitch 25 photos together to create a 32 MP panorama.
- Tiresome Move Video: If you modify to 1080p, you tin shoot up to 120 fps.
- Quickshot Intelligent Flight Modes: Mavic Air will fly along a preset path while recording videos and tracking the discipline along the way.
- Asteroid: Mavic Air will capture video starting in front of the discipline, flying backward and ascending, creating a opposite playback video that starts with a spherical view from above, descending towards the subject similar a falling asteroid.
- Boomerang: Mavic Air volition fly in a boomerang-like oval flying path around the subject, starting and stopping a video in the same identify.
- Rocket: You lot can send the Mavic Air straight up into the air with the camera pointing downward while following your subject.
- Circumvolve: Mavic Air will circle around the field of study at a abiding altitude and altitude.
- Dronie: Mavic Air will wing backward and upward, while tracking your subject.
- Helix: Mavic Air volition wing upward and away, spiraling around your subject.
To access these modes, you need to click the "Remote Command" icon on the left of the screen, then select "Quickshot" and option one of the modes from the higher up list.
In addition to these modes, in that location are also other features available for decision-making the unit with your hands. Personally, I didn't care for this feature either, since I prefer to use the controller with joystick for performing all flight and recording actions.
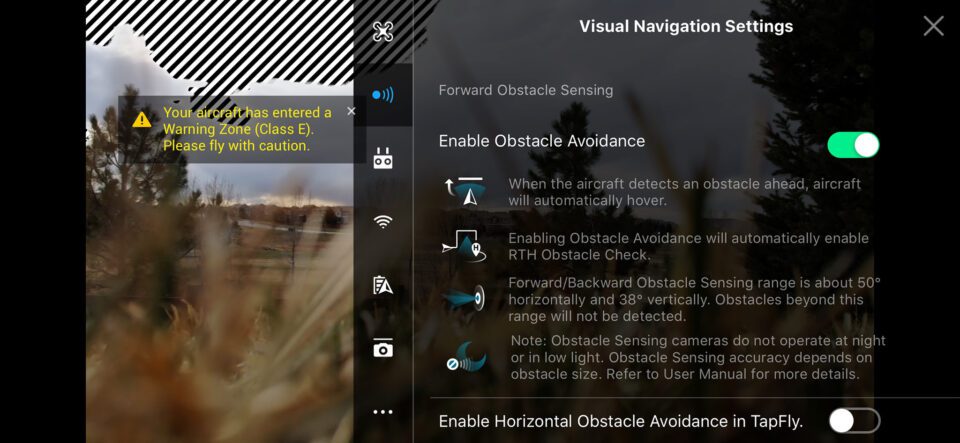
Lastly, there is a switch on the controller called "Sport". This basically allows the drone to fly at its maximum speed of 68.4 kph, which is very fast. Unless you really know what yous are doing, I would highly discourage from using this mode, because it disables all obstacle sensing and avoidance capabilities of the drone, then you might stop up losing or crashing the drone pretty chop-chop.
Image Quality
Considering that the Mavic Air has a small-scale 1/two.3″ CMOS sensor, its prototype quality is not that great. Unless you motility up to a Phantom four with a 1″ sensor, or the Inspire 2 that has a Micro 4 Thirds camera option, you are stuck with a sensor size like to what some of the cellphones have on the market today. And so you lot are not going to take amazing image quality or dynamic range, which is why the utilize of the drone is going to be somewhat limited to daytime use. While you tin can certainly capture some images in low-light, say during sunrises or sunsets, you will need to take platonic weather with no wind and fast enough shutter speeds not to crusade any blur. And even so, you lot will need to capture enough frames for an HDR or a blending stitch, since role of the paradigm is probably going to be blown out. This is expected from a small sensor organization and it is something that you will need to live with.
Below is a sample prototype that I captured with the drone in relatively depression light conditions. The "Earlier" prototype is directly out of photographic camera JPEG, while the "Later" image is with some adjustments in post-processing. Although I tried to recover some of the highlights, it was an impossible task, because they were all diddled out – it is pretty easy to blow those out if you are not careful:
And so keep this in mind when taking pictures with the Mavic Air. Personally, I concluded upwardly using the drone by and large for videos and that's where it did non disappoint.
Video Quality
Being able to tape 4K videos on a drone is pretty amazing. I set up upward the Mavic Air to shoot in 4K video the whole time and that's what y'all will run into in the YouTube video below. I highly recommend to lookout the video in full 4K resolution if you have a 4K+ monitor, because you will be able to see all the details the drone was able to capture:
In short, I'm pretty happy with what the drone is able to do video-wise. Sure, it might not do very well in depression light (and I left some scenes with very low light specifically for you to see the noise patterns) and it might not accept great dynamic range, simply for its size and weight, it is a pretty spectacular little drone. I captured enough of solid videos with the drone and the above video is a good instance of what one tin can do with very minimal knowledge and skill.
Summary
As y'all tin run into from this review, my feel with the Mavic Air has been very positive. Simply a calendar week with the Mavic Air was enough to decide that I no longer need the Phantom three Pro (which I will exist selling in the near future) and convince me to move down to something that is far more than portable, lighter and more capable. While the Phantom 3 Pro has been more often than not sitting in my closet when I travel internationally, I'm planning to bring the Mavic Air everywhere I get. Cheers to its modest footprint, it tin easily fit in my camera pocketbook, even with all the accessories and batteries. In my stance, this is the platonic solution for a traveling lensman / videographer.
DJI deserves loftier praises for making one of the all-time consumer drones on the market – a truly remarkable achievement.
Where to Buy
You can back up our efforts by buying the DJI Mavic Air from our trusted partner B&H Photo Video using the following links:
- DJI Mavic Air Fly More Combo (Onyx Black) / (Arctic White) / (Flame Red)
- DJI Mavic Air (Onyx Black) / (Chill White) / (Flame Cherry-red)
DJI Mavic Air
- Features
- Build Quality
- Treatment
- Value
- Prototype Quality
- Loftier ISO Performance
- Size and Weight
- Metering and Exposure
- Motion-picture show Recording Features
- Dynamic Range
- Ease of Employ
- Speed and Performance
- Stability
- Bombardment Life
Photography Life Overall Rating

Source: https://photographylife.com/reviews/dji-mavic-air
0 Response to "What Does Iphone X Reviews of Mavic Air Look Like"
Post a Comment